Twitter Verification is back! Activists, influencers, and brands can once again request Twitter’s blue badge (a.k.a. the blue checkmark) that could appear next to their names on Twitter.
The blue verified badge on Twitter lets people know that an account of public interest is authentic. To receive the blue badge, your account must be authentic, notable, and active.
Dear “can you verify me” ––
Save your Tweets and DMs, there’s a new official way to apply for a blue badge, rolling out over the next few weeks.
You can now submit an application to request verification in-app, right from your account settings!
-Your verified blue badge source pic.twitter.com/2d1alYZ02M
— Twitter Verified (@verified) May 20, 2021
I had the pleasure of applying for Twitter verification for one of my clients and wanted to show you how to submit an application to get Twitter verified.
It was very easy to apply. You just need to make sure that you meet some requirements before you do so:
1. Your account must be authentic, notable, and active.
-
Authentic means you have to confirm your identity with Twitter by providing one of these three things: a link to your official website, an official government-issued identification, or an official domain-based email address.
2. You must represent or be associated with a prominently recognized individual or brand.
-
Notable brands include companies, news organizations, journalists, entertainers, professional sports, activists, or influencers.
3. Your account must be active meaning:
-
Your profile must be complete and include a profile name and image.
-
You must have logged into your account within the last six months.
-
Your account has to have a confirmed email address or phone number.
-
It must follow the Twitter rules that state you must not have had a lockout for violating the rules in the past 12 months.
You will find a list of things that could make your account ineligible in the resources section at the end of this post.
If you don’t see the option to get verified as described in the steps below, do not be alarmed, it is still being rolled out, so you may or may not see it in your account, yet.
Also, please note that I applied for the ‘Activist, organizer or influencer’ verification for my client, so some of your screens may be different depending on the type of Twitter account you are submitting the application for. Other options may also be different depending on what you select in each step.
STEP-BY-STEP GUIDE TO APPLYING FOR TWITTER VERIFICATION (ON DESKTOP):
1. Log in to your Twitter account on your desktop computer. By default, this will bring you to the ‘Home’ feed.
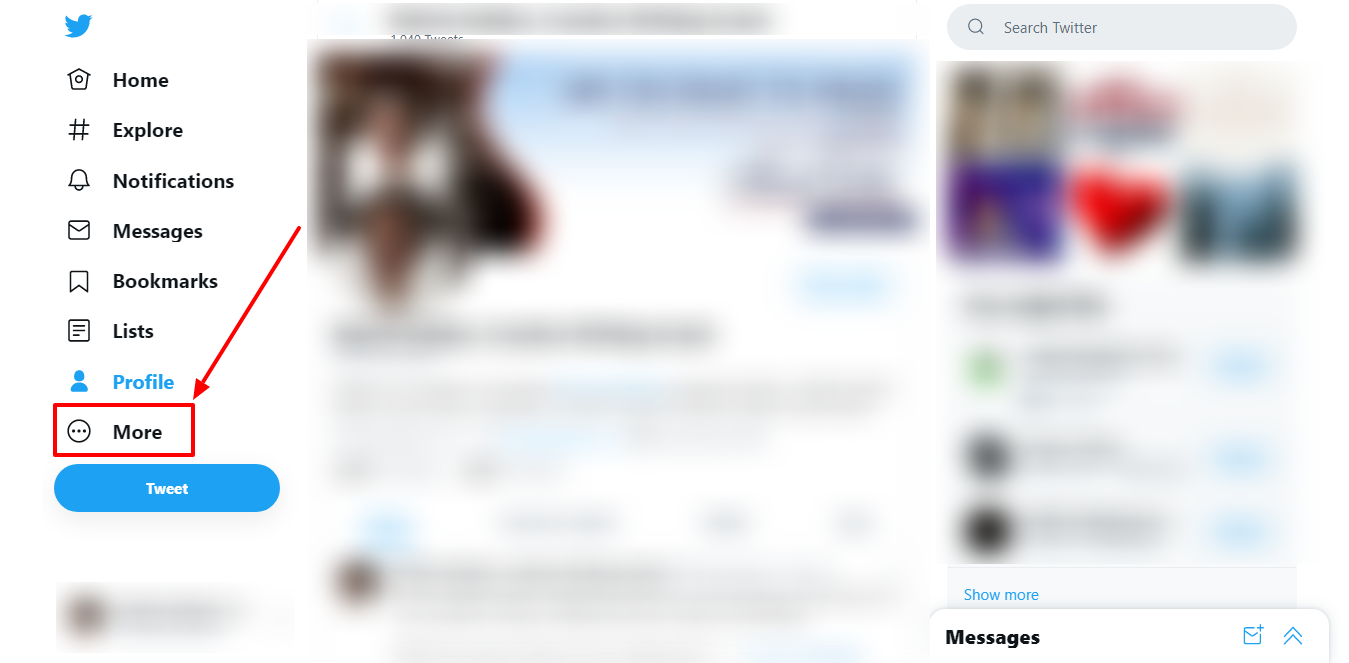
2. Click on ‘More’ on the left side navigation.
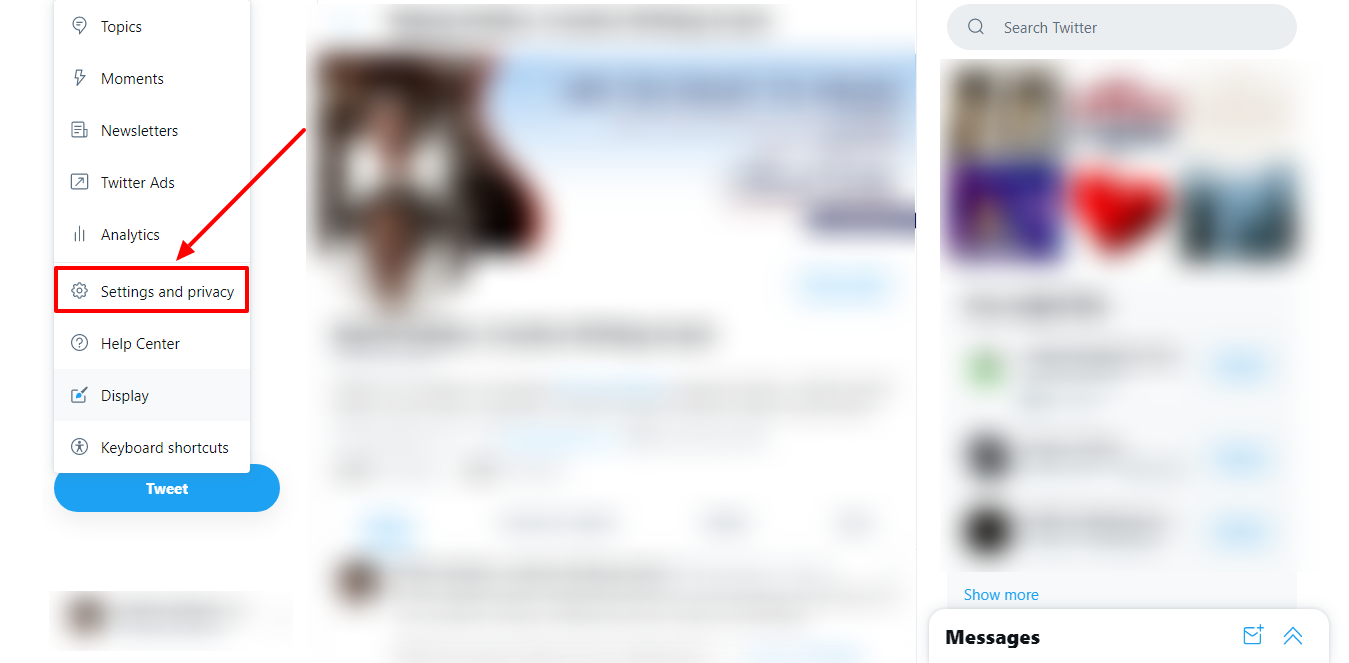
3. Next, click on ‘Settings and privacy’ also found on the left navigation.
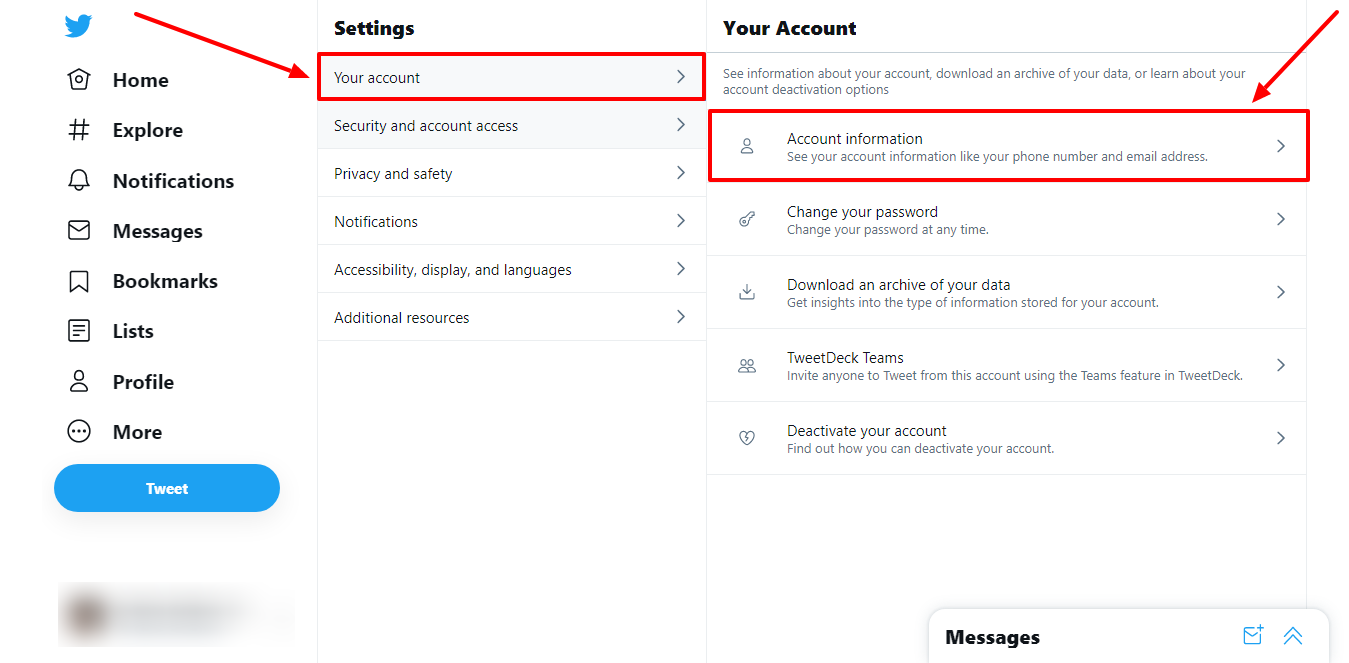
4. On the ‘Settings’ page, click on the ‘Your account’ link. Then, click on the ‘Account information’ link.
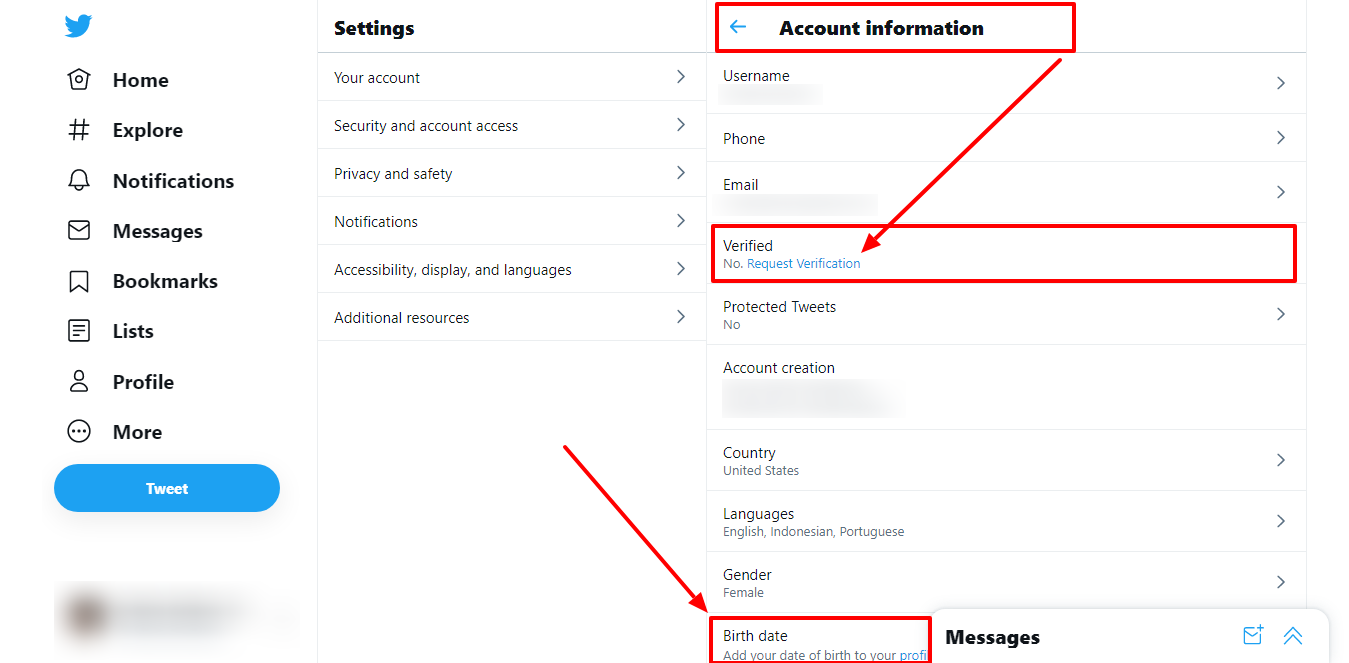
5. Under the ‘Account information’ section, you will see a section that says ‘Verified.’ BUT WAIT! Before you click there, I want to mention that Twitter used to require that you enter your birth date before they would approve your application, however, I do not see that in the new requirements. I do, however, recommend that if you have not already added your birth date to your Twitter profile, do so before proceeding with the application. Go ahead and click the ‘Add your date of birth to your profile’ link under ‘Birth date’ at the bottom of the ‘Account Information’ page.
If you stopped to add your birth date, Twitter actually took you back to your profile to do that, so you will need to follow steps 1-4 above to get back to the ‘Account information’ page.
Now, on the ‘Account information’ section, and under the ‘Verified’ section, if it says, ‘No’ that means your account has not been verified, so go ahead and click on the blue ‘Request verification’ link. You can see what I’m referencing in the screenshot above.
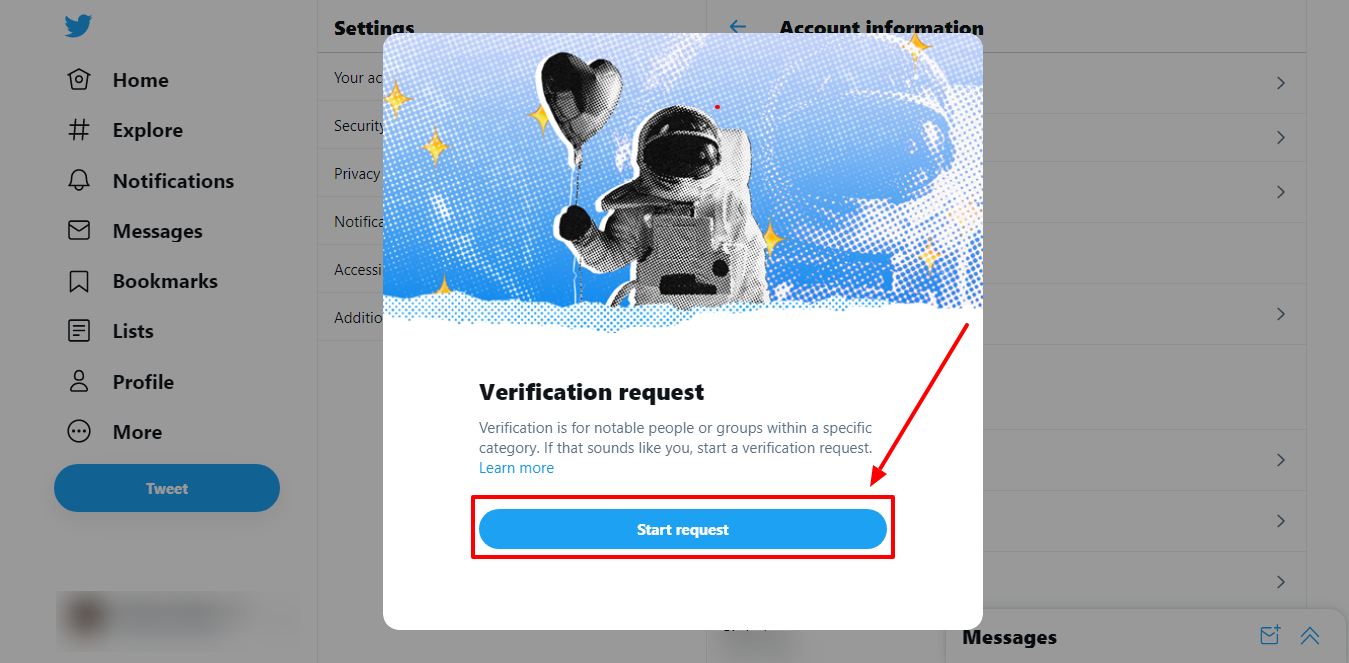
6. This will bring you to a ‘Verification request’ box that states, “Verification for notable people or groups within a specific category. If that sounds like you, start a verification request.”
Click on the ‘Start request’ button.
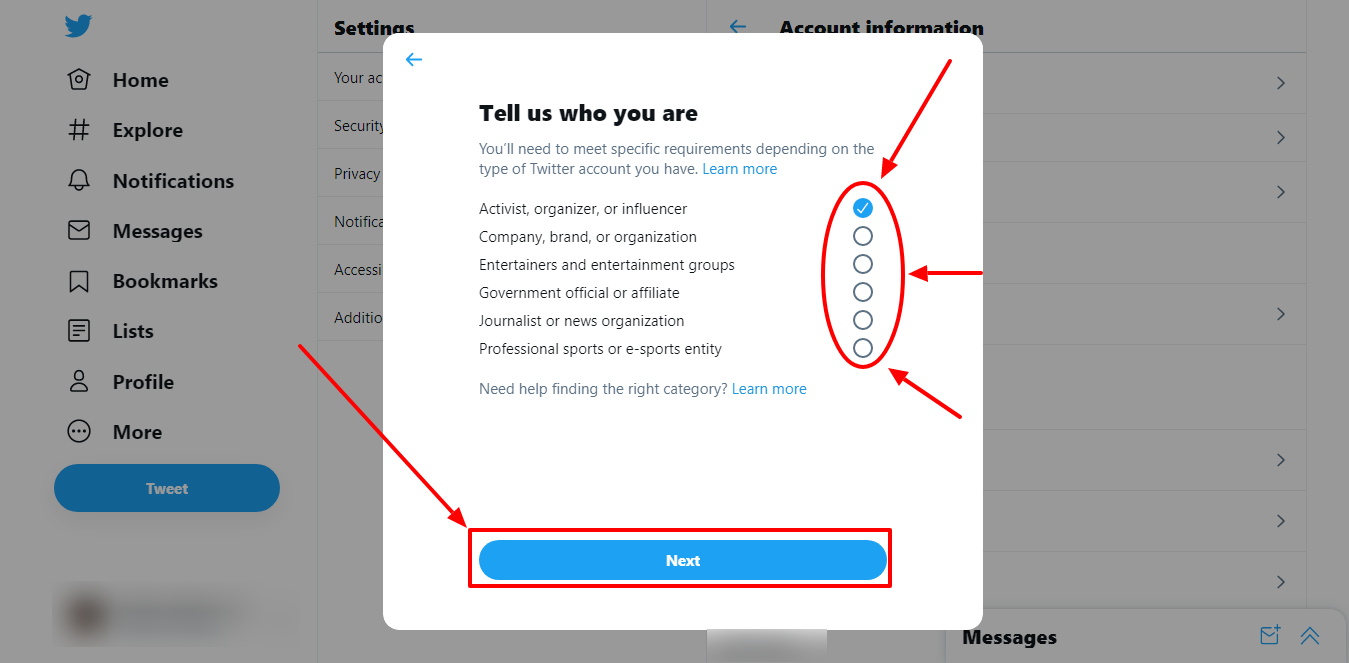
7. The next box is ‘Tell us who you are.’ This is where you will check the box next to the type of Twitter account you have. The options include:
-
Activist, organizer, or influencer
-
Company, brand, or organization
-
Entertainers and entertainment groups
-
Journalist or news organization
-
Professional sports or e-sports entity
Once you have selected your account type, click on the blue ‘Next’ button.
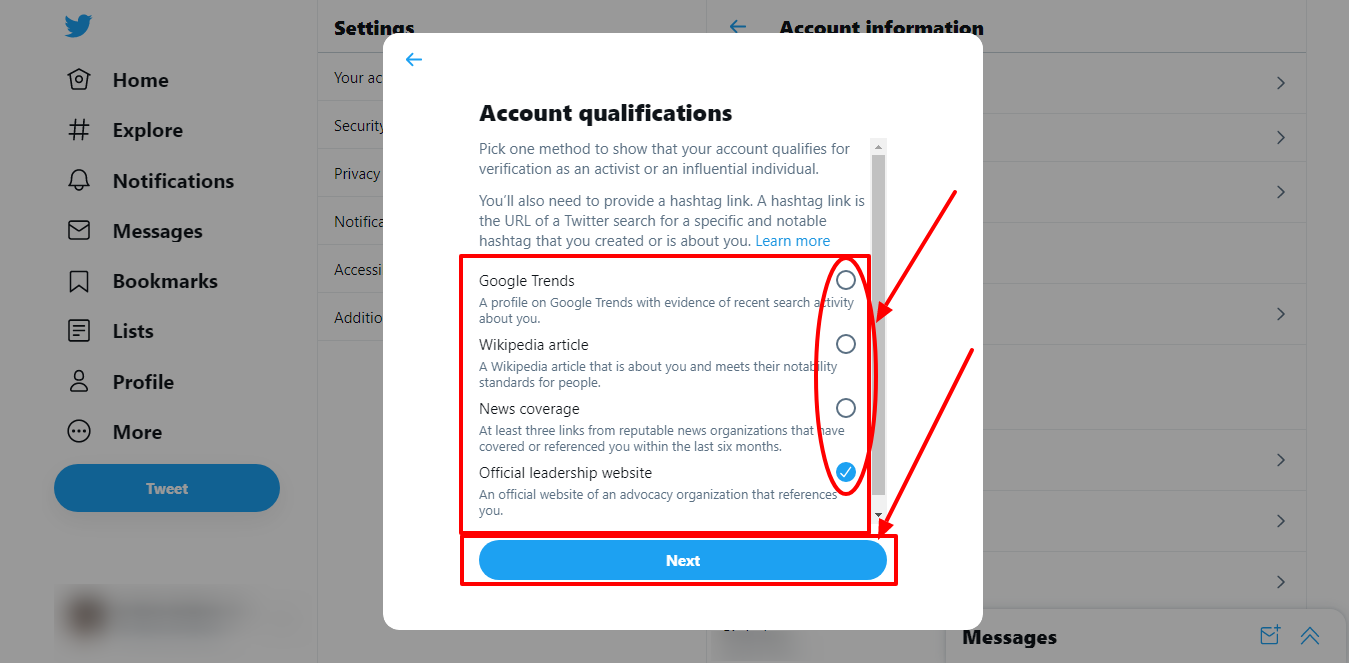
8. Now you should be on the ‘Account qualifications’ box where you should choose one method of verification that will show that your account qualifies for Twitter verification. Your options are:
-
Google Trends profile with evidence of recent search activity about you
-
Wikipedia article that is about you and meets Wikipedia’s notability standards for people
-
News coverage from reputable news organizations
-
Official leadership website that references you
Select one then click on the blue ‘Next’ button.
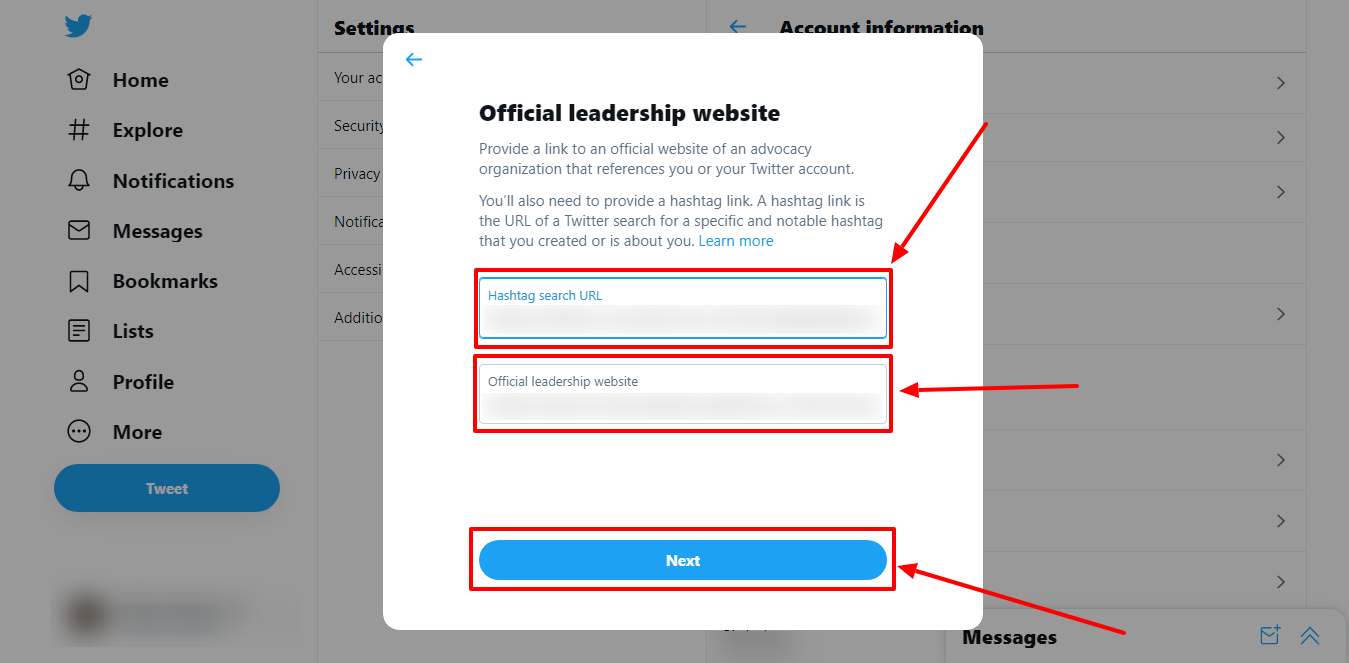
9. If you chose the ‘Official leadership website’ option, this will bring you to the ‘Official leadership website’ box (again the options may be different depending on what you select in each step).
In this box, you will need to enter the Twitter search URL for any hashtags that you created or hashtags that others create about you.
You will also need to enter a link to the ‘Official leadership website’ that makes reference to you or your Twitter account.
Click ‘Next’ to get to the next box.
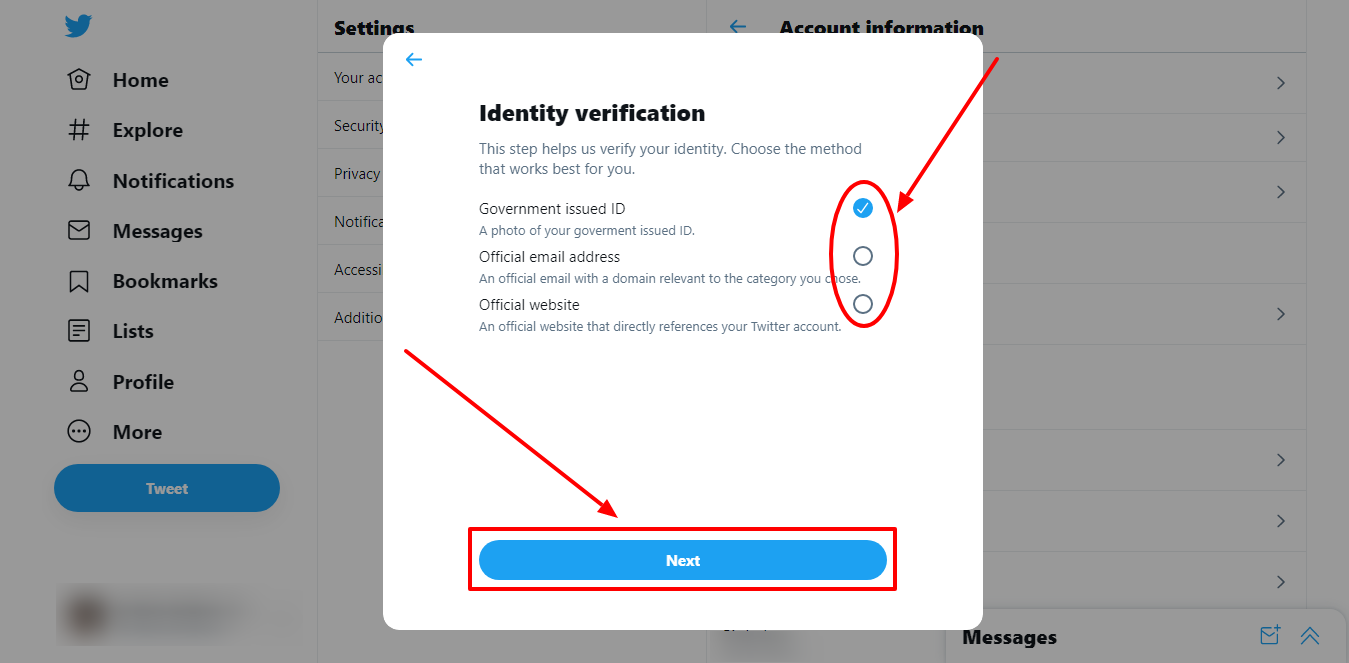
10. Now you will see the ‘Identity verification’ box. Here you will choose how Twitter can identify you.
Click one of the three choices. If you click ‘Government-issued ID,’ you will need to upload your drivers’ license or other ID. If you choose ‘Official email address,’ you will be asked to provide a domain-based email address. If you select ‘Official website,’ you will be asked to enter a website address that references your Twitter account.
After you’ve made your selection, click the blue ‘Next’ button.
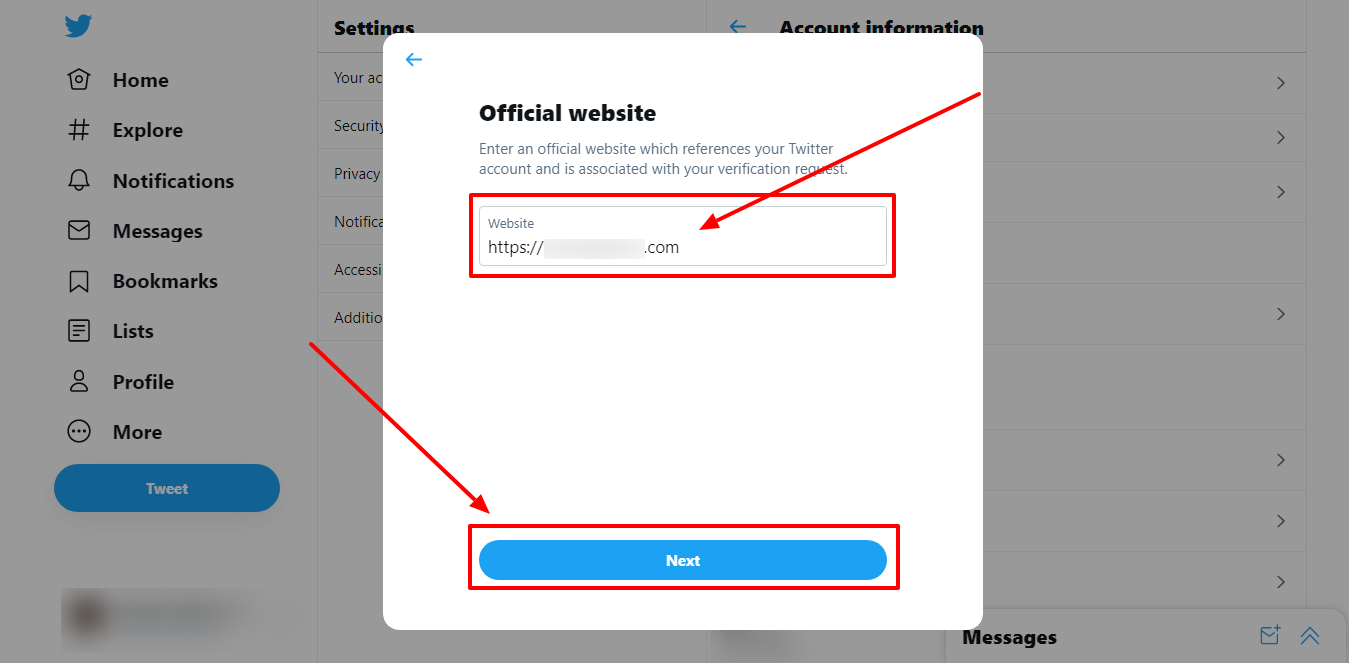
11. On the ‘Official website’ box enter your official website URL including the https, and click ‘Next.’
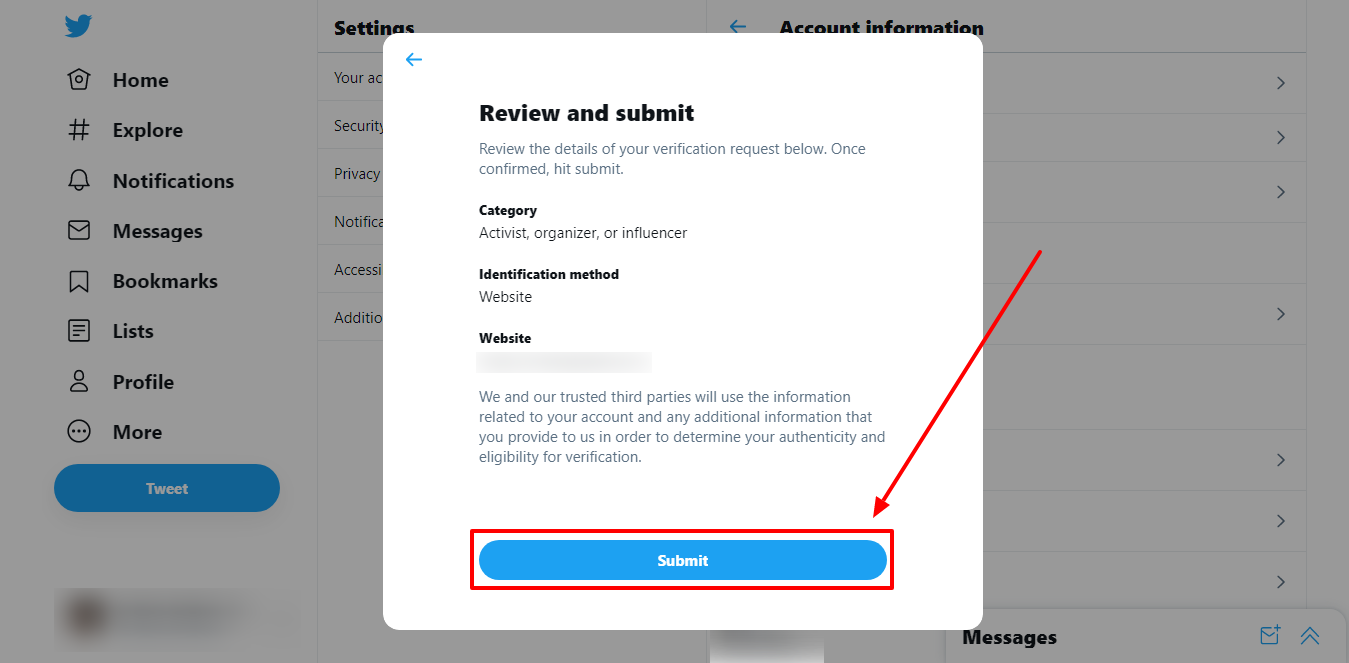
12. Finally, you will be given the opportunity to ‘Review and submit’ your application. If you approve of what you see, click on the blue ‘Submit’ button.
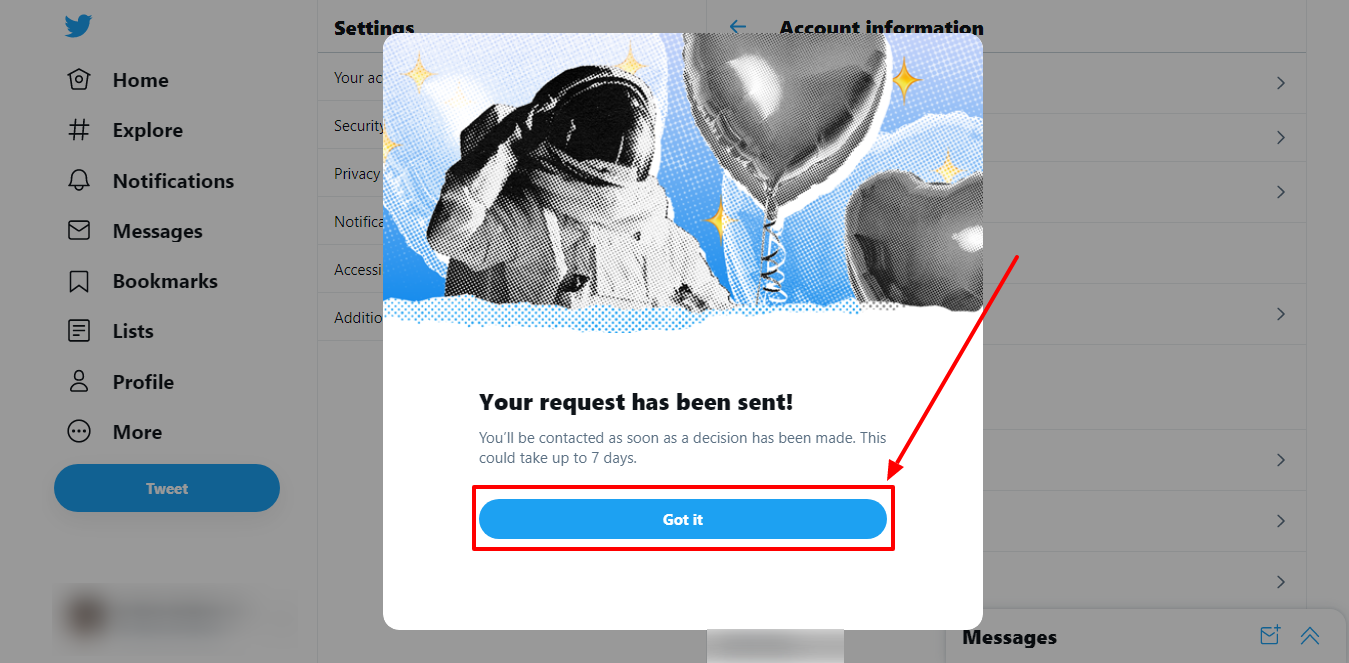
13. You should now see a ‘Your request has been sent!’ box with a message that says, “You’ll be contacted as soon as a decision has been made. This could take up to 7 days.
Click on the ‘Got it’ button, and you are all done. Now all you have to do is wait for Twitter to make a decision whether they will approve your request.
To learn more about Twitter verification, click on the links in the ‘Resources’ section below.
Resources:
Author: Romona Foster
Romona Foster is the Social Media Trainer and Consultant at Social Media How To’s with Romona. Romona teaches small businesses and nonprofits how to use Facebook, LinkedIn, Twitter, Instagram, Google My Business — and the best practices of Email Marketing, Online Marketing, Affiliate Marketing, and Personal Branding. She is a featured contributor with Business2Community and is a Constant Contact Community blogger.

