
Disclosure: Some companies that I mention are my marketing and training partners. I am an affiliate of others. I get commissions for purchases made through affiliate links on this page. I only recommend products and services from companies I trust, tools I’ve used, and those that I highly recommend and feel may be of value to you and beneficial to your marketing efforts.
Are you thinking about creating a website for your business, but don’t know where to begin? Well, here’s where you start.
Hopefully, by now you have a business name. Your business name is most likely what your domain name will be with either .com, .net, or .org as it’s domain name extension. I say most likely because there may be some reason why you want to use something other than your business name for your domain name. Some reasons may include:
-
The website you are creating is for a product that you have developed. In this case, you may want to use the product’s name as your domain name.
-
You are creating a personal brand using your name as the domain name — such as romonafoster.com.
-
Your domain name is unavailable. In this case, you may need to shorten your domain name or add inc, llc, cpa or something that corresponds with your business type or structure on the end of your domain. Just make sure you keep it as short as possible, as close to your business name as possible, relevant to your business, and use keywords when possible.
Now, let’s get you started on what you came here for … getting your new domain name! Just follow these steps:
1. Click here to register your domain name for $4.99 (good for one year) with GoDaddy.
2. Type the domain name of your choice in the domain name search bar. In this example, I have chosen howdoiusewordpress.com

3. Click the ‘Search’ button to the right of the domain name search bar. You’ll either get an onscreen message that says, “Yes! Your domain is available.” or “Sorry, [yourdomain.com] is taken.”
If you receive the sorry message, that means your domain name is unavailable and you’ll have to search until you find a domain name that is available. If your domain name is available, move on to the next step.

4. This is a good time to verify that your domain name is spelled correctly and that you’ve chosen the right domain extension for your type of business (.com, .org, .net, .edu, etc.). Once you’ve done that, go ahead and click on the ‘Add to Cart’ button to the right of the domain name. You’ll then see a green check mark in front of the word, ‘Added’, which indicates you have added the domain name to your shopping cart.
On this same screen, click the ‘Continue to Cart’ button in the top right corner.

5. We can learn a lot from GoDaddy on upselling our products and services on this next page as they will ask if you want to add privacy (i.e., make your domain name information private). This is completely up to you. If you don’t want anyone to see who owns your domain name, click either the ‘Privacy Protection’ or ‘Privacy & Business Protection’ button. Please note, there is a fee for adding privacy to a domain name.
On this same page, they will ask if you want to create an email address that matches your domain name (i.e., a domain-based email or as we marketers call it, a branded email address) such as romona@howdoiusewordpress.com. (Tip: Do not use info@, support@, admin@, contact@, hello@ or any of those un-personable email addresses. It’s best to humanize it like rfoster@, or romona@, or romonafoster@.)
If you are using this domain name to create your business WordPress website, I suggest you purchase the matching email address for brand consistency. It will make your business look more credible then if you use a Gmail, Hotmail, Yahoo! or AOL email address.
After you’ve made your selections, click on the ‘Continue with these options’ button at the bottom of the options box.

6. Now you are ready to check out.
First, look to the right to make sure the correct domain is in your cart. Then, check to make sure you are purchasing the domain name for the number of years you want it for. By default, GoDaddy shows 2 years. Click the down arrow in this section if you want the domain name for more or fewer years.
Next, you will either click on ‘Create Account’ or ‘Sign in’. If you already have an account, go ahead and sign in. If you are new to GoDaddy, you will need to create an account. In this example, I have selected ‘Create Account’.

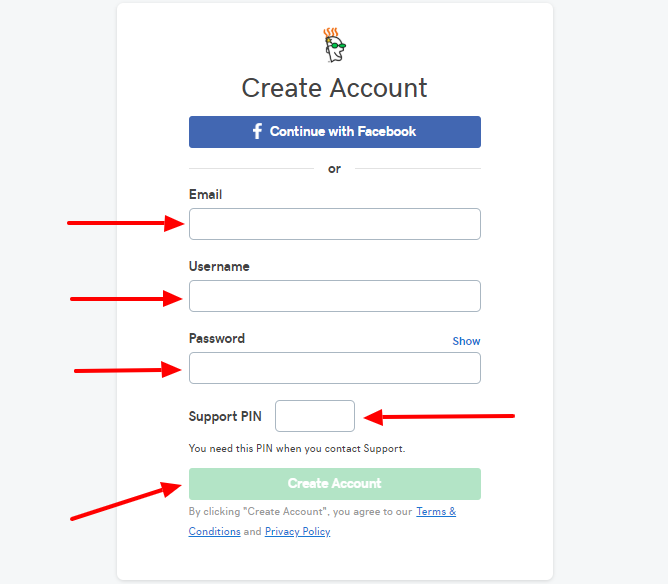
7. Enter your email address, create a username, password, and support pin (you’ll need this if you ever contact GoDaddy support). Then click ‘Create Account’ again.
8. This will bring you back to the checkout page. Fill in the entire contact form and click ‘Save’.
On the next screen fill in your credit card or checking account information and click ‘Save’. You’ll then land on another page that asks you to click on the ‘Complete Purchase’ button. Finally, you’ll see a “Thank you for your order!” confirmation stating a receipt has been emailed to you.


That’s it. Congratulations! You are now the owner of a domain name. Yay!
In a future post, I’ll show you how to create a WordPress website to go with your shiny new domain name, so if you didn’t get yours yet, be sure to get it now.
Author: Romona Foster
Romona Foster is the Social Media Trainer and Consultant at Social Media How To’s with Romona. Romona teaches small businesses and nonprofits how to use Facebook, LinkedIn, Twitter, Instagram, Google My Business — and the best practices of Email Marketing, Online Marketing, Affiliate Marketing, and Personal Branding. She is a featured contributor with Business2Community and is a Constant Contact Community blogger.