
How To Install
Google Site Kit Plugin for WordPress
As a small business owner, you should be paying attention to how people are finding your business online — and how they are responding to your website and content.
Are people finding you through organic search, through a direct search, or through referral traffic?
Which of your pages and posts are most popular? How many views did those posts and pages receive? What did people search for to find those pages and posts?
At one time, one would have to use a number of tools to gather this information, but Google has now made it easy with their Site Kit for WordPress Plugin.
Before I give you the step-by-step instructions on how to install the Site Kit plugin on your WordPress website, let’s talk a little about Site Kit …
What is Site Kit by Google?
Google’s official WordPress plugin gives you insights about how people find and use your site, how to improve, and monetize your content, directly in your WordPress dashboard.
What’s included with the Google Site Kit?
-
Google Analytics
-
Google Search Console
-
PageSpeed Insights
-
Google Optimize
-
Google Tag Manager
-
Google AdSense
To get more information on each of these Google services, check out the resources at the end of this article.
After installing Google Site Kit, you will know:
-
How people find your website
-
How people are using your site
-
How your web pages are doing
-
Where you can make website improvements
-
If you’ve made any money from the ads on your website
Spending time on your online marketing is a necessary investment if you want to learn what interests your customers, and keeps them coming back.
That being said, know that installing Google’s Site Kit is a pretty long process, so you will need a little patience setting it up. Just be sure to set aside a couple of hours out of your day.
You don’t have to do it all in one sitting. You can add one service, and come back and add the others later. Whether you choose to do it all at once or at different times, I promise you, it will be worth it for you to know more about your website traffic and how to improve your WordPress site.
Now, let’s do this!
Steps to Downloading and Installing Site Kit by Google:
1. Go to the Site Kit website.
2. Click on the blue ‘Install Site Kit’ button.

3. This will take you to Site Kit’s WordPress Plugin page.
4. Click on the blue ‘Download’ button.
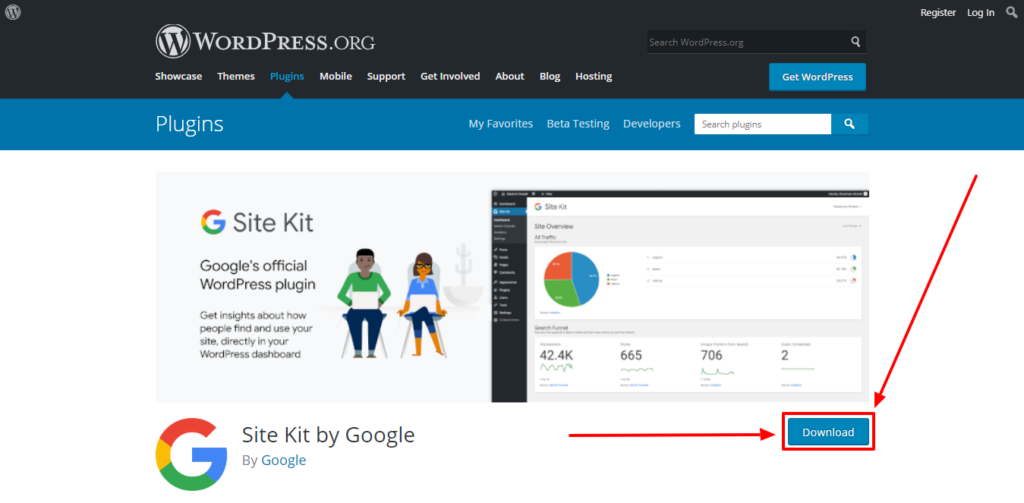
5. Download the Site Kit plugin .zip file to your computer’s hard drive — preferably to a folder you have designated for your WordPress site files.
6. Login to the WordPress site where you want to install the Site Kit plugin.
7. Click on the ‘Plugins’ link on the left side of your admin panel.
8. Click on ‘Add New’ to add a new plugin.

9. Click on the ‘Upload Plugin’ button to the right of the ‘Add Plugins’ text.

10. You will now be prompted to install your plugins .zip file. To do this, click on the ‘Choose File’ gray button. When your computer’s file search box opens, find the google-site-kit.1.0.4.zip file that you downloaded from Site Kit’s WordPress plugin page in step 4. Now, click on the .zip file, and click ‘Open’ to upload the plugin file.
11. Click on the ‘Install Now’ button.

12. This will bring you to a page where you will see that the plugin is being unpacked and installed. When you see ‘Plugin installed successfully’ it is finished installing. If you receive an error instead such as install unsuccessful, you may need to click on the ‘Return to Plugin Installer’ link, then reinstall it and start the process all over.
13. Click on ‘Activate Plugin’ to activate the Site Kit plugin.

14. You should now see ‘Congratulations, the Site Kit plugin is now activated’ and a blue ‘START SETUP’ button, but don’t celebrate yet. We’ve still got some work to do.

You will also see, “Help us improve the Site Kit plugin by allowing tracking of anonymous usage stats.” If you are interested, click on the Google Privacy Policy to read it. Then check the box. (This is optional.)
15. Once you click on the blue ‘START SETUP’ button, you will be taken to the setup page.
Where you will be told to verify that you own yourdomain.com and to help you set up your Search Console property, sitekit.withgoogle.com wants to access yourdomain.com and your Google Account data.
As you can see the setup steps on this page are as follows:
-
Verify site ownership
-
Allow yourdomain.com to access Google Account data
-
Set up Search Console
You’ll need to sign in with your Google Account to start the process, so when you are ready, click on the blue ‘Sign in with Google’ button.

16. Now, choose a Google account to log in with. If you’re already logged in to the account where your Google Analytics and other Google tools are, click on your account. If you are not logged in to that account, click on ‘Use another account’ to login to the Google account attached to your Google Analytics.
If you do not already have Google Analytics or an account with other Google tools, either create a new Google account or click on ‘Use another account’ to login to the account that you want to use with your business Google tools. (Suggestion: setup up a business Google/Gmail account, and use this account specifically for all of your Google business products like YouTube, Google Drive, Google Calendar, Google My Business, etc.)

17. After you click on your account, there will be two steps where you will need to ‘Grant Site Kit permission’ to view and manage your Google Search Console data for your website. On the first step, do this by clicking on ‘Allow’. If you don’t want to grant access, then click on ‘Deny’. If you deny, you will not be able to view your website’s Search Console data in your WordPress dashboard.

18. On the second step, grant permission to manage the list of websites and domain names you control. Once again, click ‘Allow’ or ‘Deny’.

19. You will now need to ‘Confirm your choices you are allowing Site Kit’ to do by checking the boxes. The choices include:
-
Associate you with your personal info on Google
-
See your personal info, including any personal info you’ve made publicly available
-
View your email address
-
View and manage Search Console data for your verified sites
-
Manage the list of sites and domains you control
Be sure to read the terms of service, privacy policy, the ‘Learn about the risks’ section, and the part that tells you how to remove access in your Google account under the ‘Make sure you trust Site Kit’.
When you are finished, click on the blue ‘Allow’ button.

20. You should now see, ‘You’re a verified owner of yoursite.com’

21. The next step is to give your WordPress website access to your Google Account data to display your website metrics on the Google Site Kit dashboard in WordPress.
You will be able to view or remove access for yoursite.com in your Site Kit dashboard at any time.
Click on the blue ‘Allow’ button as you see in the image above.
22. The next page should be congratulating you for successfully setting up Google’s Site Kit.
You will now be able to see how your site appears in Google Search, how many visitors you got from the Search, your most popular pages, and how people found them through Search (i.e., whether they performed a general Google Search and found your website or they typed your website address in search organically for example).

23. If you have not set up your Google Search Console yet, you will be taken to the third step, ‘Set up Search Console’. Mine is already setup, so I won’t be able to walk you through this section at this time. What you will want to do is follow the onscreen directions. It’s just as simple as what we just did above.
24. Finally, what you should do is go to your WordPress site Dashboard. Do this by clicking on the blue ‘Go to my Dashboard’ button as seen in the image above.
25. Congrats on completing the setup for Site Kit!
Now you’ll be able to see how your site is doing in Google Search. To get even more detailed stats, activate more modules. Here are our recommendations for what to include in your Site Kit:
-
Search Console, which should already be connected.
-
AdSense, click ‘Connect Service’ if you are an AdSense user.
-
Analytics, click ‘Connect Service’ if you are an AdSense user.
-
PageSpeed Insights, click ‘Connect Service’ if you are an AdSense user.

Connecting Google Adsense
To connect your Google AdSense account, click ‘Connect Service’ in the AdSense box. You will be prompted to log in to your Google account just like above. You will also be asked to grant permission or deny permission.

If you choose to allow permission, you will be sent back to your WordPress website to continue setting up your AdSense acount. Click ‘Continue’ or ‘Cancel’ if you don’t want ads placed on your site.
TO CONNECT MORE SERVICES …
Click on ‘Site Kit’ in the left side panel of your WordPress dashboard. Then click on ‘Settings’.
Click on ‘Connect More Services’ to add Google Analytics, Google PageSpeed Insights, Google Optimize, and Google Tag Manager.

Connecting Google Analytics
After you’ve clicked on ‘Connect More Services’ you can connect your Google Analytics account by clicking the ‘Set up Analytics’ link in the Analytics box.

You will be prompted to log in to your Google account just like above. You will also be asked to grant Google Site Kit permission or deny permission.
After you grant permission, you will be taken back to your WordPress website.
Check the ‘Account’ and ‘Property’ boxes to make sure the correct websites you want to connect to your WordPress account are listed. Then, click ‘Configure Analytics’ to complete your Analytics set up.

You Are Now Ready To Connect PageSpeed Insights
This is an easy setup process. Just click ‘Connect More Services’ to connect your PageSpeed Insights account. Then click on ‘Set up PageSpeed Insights’.
OPTIONAL SITE KIT SERVICES TO CONNECT …
I highly recommend that you get your web developer or someone who is highly technical to set up the last two services for you. I am going to do the same as I believe in outsourcing what I don’t completely understand — and this is one of those times. 🙂
To learn more about these optional Site Kit Services, see the resources at the end of this post.
Setting Up Google Optimize
Click on ‘Site Kit’ on the left side panel of your WordPress dashboard. Then click on ‘Settings’.
Click ‘Connect More Services’ to set up Google Optimize. Click ‘Set up Optimize’ to get started if you are going to do it yourself. Then follow the Google Optimize instructions.


Setting Up Tag Manager
Click on ‘Site Kit’ on the left side panel of your WordPress dashboard. Then click on ‘Settings’.
Click ‘Connect More Services’ to set up Google Tag Manager. Click ‘Set up Tag Manager’ to get started.

You will be prompted to log in to your Google account just like above. You will also be asked to grant permission or deny permission.
If you choose to allow permission, you will be sent back to your WordPress website to continue setting up your Tag Manager account.
(I received “Error: We didn’t find an associated Google Tag Manager account, would you like to set it up now? If you’ve just set up an account please re-fetch your account to sync it with Site Kit, so I clicked on the ‘Create An Account’ button. You may need to do the same.)
If you clicked on the ‘Create An Account’ button, it will take you to the Tag Manager page.

Click on the blue ‘Start for free’ button in the upper right-hand corner.
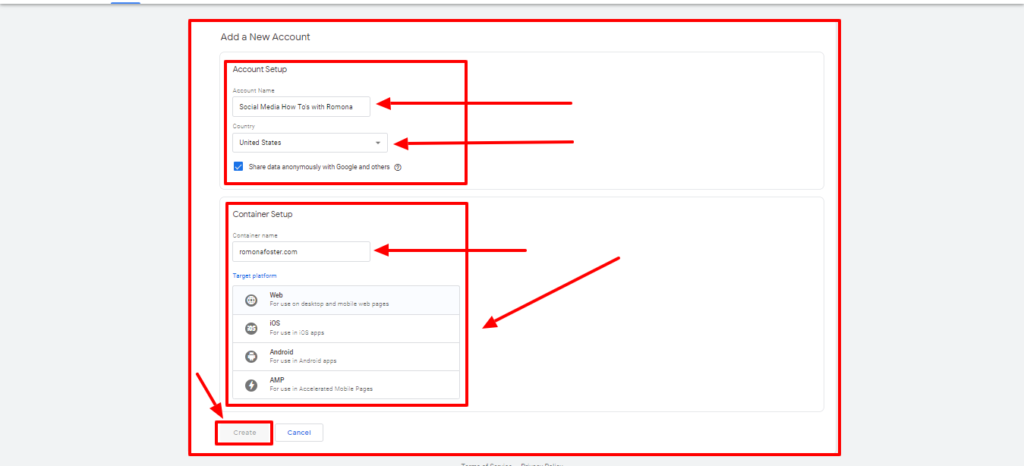
On the ‘Add a New Account’ page, enter your ‘Company Name’, ‘Country’ and check the box if you want to share your data anonymously with Google and others.
Under ‘Container Setup’, enter your website address, and your ‘Target platform’ i.e., Web, iOS, Android, or AMP.
I selected ‘Web for use on desktop and mobile web pages’.
Now, click on the ‘Create’ button.
This will bring you to the Google Tag Manager Terms of Service Agreement.
Check the ‘I also accept the Data Processing Terms as required by GDPR’ box at the bottom of the page. Then, in the upper right-hand corner, click on the blue ‘No’ or ‘Yes’ button if you agree or disagree.
You will now see the ‘Install Google Tag Manager’ code popup box. This is the code you will need to add to the head and body tags in your WordPress website to manage your tags. (Now do you see why I said to get your web developer to do this for you?) 🙂

You will need to copy the first block of code and paste it onto every page of your website in the <header> tag of the page, and copy the second block of code immediately after the opening <body> tag.
This screenshot shows you what it looks like when you insert the Tag Manager code into your WordPress site.

You will need to go back to your Site Kit settings by clicking on ‘Settings’ under ‘G Site Kit’ on the left side panel of your WordPress dashboard.
Under ‘Settings’ you should see that all of the Google services are connected and indicated by a green checkmark. The only one that is not fully connected is the ‘Tag Manager’ which is indicated by a yellow warning icon to the right on the ‘Tag Manager’ row.

To fix this, we need to complete the final steps.
So, click on the drop-down arrow to the right of the ‘Tag Manager’ yellow warning icon. Then click on the ‘continue module setup’ link on the left side to the right of the words ‘Setup incomplete’ — as you see in the image above.
The ‘Tag Manager’ page will come up telling you to select your ‘Tag Manager’account and ‘container’ (your website address). It also mentions that the snippet will be inserted into your website.
Go ahead and click on the blue ‘Confirm & Continue’ button.

The next message you should see is a happy one, “Congrats on completing the setup for Tag Manager!” Hip, hip hooray, we’re all done! LOL!

Again, please, please do not attempt to do this yourself if you do not completely understand how to do it. Learn how to ask for help if you are one who tries to be all things and do all things (i.e., stay in your lane peeps!)
That brings us to the conclusion of how to install the Google Site Kit on your WordPress website.
When you have completed the entire setup, go back to ‘G Site Kit’ on the left side panel of your WordPress dashboard and click on your Google Site Kit ‘Dashboard’ (not be confused with the WordPress ‘Dashboard’ above ‘G Site Kit’).
You will see your ‘Site Overview’ which will show you whether people found your website through an organic search, directly by typing in your website address or from a referral search.
You will also see how many people visited your website, how many clicked, your most popular pages, how much you earned with the ads on your site, it will allow you to search for individual pages or posts on your site and view the data — you will be able to see how fast your home page is loading. As you can see mine needs a lot of work, and when I get around to fixing it, I just may write a post about it so you can see what you need to do to speed up your site if you need to speed your website up as well.

For me, this has been a real eye-opener — and I leave you with this, your website is an investment in your business, so do what you need to do optimize it for Google and the other search engines.
Also, use your Site Kit results to learn what your customers and clients are interested in and give them more of that.
If you pay close attention to my most popular pages section above, you will notice that my audience is super interested in Facebook, so I need to really provide more classes and content on Facebook for businesses. Be sure to pay close attention to your results and do the same.
We are truly done at this point, but be sure to check out the additional resources I have included below. These may answer some questions you may still have after reading this post.
GOOGLE SITE KIT BONUS:
What Is Google Search Console?
Search Console measures your site’s Google Search traffic and performance.
What Is Google AdSense Console?
AdSense helps you to earn money from your online content by placing Google Ads in places like on your website and in your YouTube videos.
What Is Google Analytics
Google Analytics tells you how users find, use, and engage with your site plus it helps you get a deeper understanding of your customers.
What Is Google PageSpeed Insights
PageSpeed Insights analyzes your website and suggests ways to make it faster.
Google PageSpeed Insights gives you metrics about performance, accessibility, Search Engine Optimization (SEO) and Progressive Web Apps (PWA).
What Is Google Optimize
Google Optimize allows you to create A/B tests that help you drive metric-based design solutions to your site.
What Is Google Tag Manager
Tag Manager creates an easy to manage way to create tags on your site without updating code.
GOOGLE SITE KIT FAQ’s:
Why use Site Kit for WordPress?
Site Kit makes it easy to set up and configure key Google products, giving you authoritative and up-to-date advice on how to succeed on the web
Site Kit is useful for you if you are …
-
A website owner: If you have a website and would like to see how users find and use your website. Site Kit helps you set up and use easy-to-understand metrics to help you grow your online presence. Learn more about Site Kit by Google for website owners >>
-
A developer or agency: If you work on a WordPress website for a client, Site Kit is the one-stop solution to deploy, manage, and get insights from critical Google tools to make the site successful on the web. Learn about Site Kit for developers >>
-
A plugin or a hosting provider: If you work on a plugin, or hosting provider, Site Kit provides a scalable, easy way for your users to access key Google tools and metrics. Learn more about Google Site Kit for plugins >>
As always if you need help with any of this? Feel free to schedule a FREE consultation with me here!
Resources:
- Site Kit: Google’s Official WordPress Plugin
- Getting Started with Google Site Kit: Documentation
- Google Site Kit News
- Install Site Kit by Google Plugin
- Site Kit Terms of Service
- Site Kit Privacy Policies
- Third-party sites and apps with access to your account
- Set up Google Optimize
- Google Optimize Terms of Service
- Google Optimize Data Processing Terms as required by GDPR
- Google Optimize Data Processing Amendment
- Google Optimize Measurement Controller-Controller Data Protection Terms
- Google Marketing Platform: Tag Manager
Author: Romona Foster
Romona Foster is the Social Media Trainer and Consultant at Social Media How To’s with Romona. Romona teaches small businesses and nonprofits how to use Facebook, LinkedIn, Twitter, Instagram, Google My Business — and the best practices of Email Marketing, Online Marketing, Affiliate Marketing, and Personal Branding. She is a featured contributor with Business2Community and is a Constant Contact Community blogger.