
Here we go again! Another day without being able to login to our Facebook Business Pages.
Yesterday, Facebook (and Instagram) were down for most of the day, and I have to say as a social media manager I almost panicked.
The video below is an update to this post. It was created on July 3, 2019, after many people experienced issues posting to and viewing content on Facebook.
I couldn’t log in to my Facebook account at all. I could log in to some client accounts but nothing would post. I logged in to my pastor’s personal page only to find that the church’s Business Page was completely gone. Yikes!
As scary as it was, I along with many others had faith enough to believe that Facebook would work out the problem and make a come back — and thankfully they did.
This post is another reminder to you that you do not own what is on Facebook’s site, therefore again I am reminding you to download the content you’ve posted and the data that has been generated on your Facebook pages at least once a month.
This time, I will show you how to download the information from your Facebook Business Page. If you missed the post I did on downloading your Facebook Personal Page content and data, you will find that post here.
So, let’s do this! Follow these steps to save your data to your computer. I promise, it will be well worth your time and effort.
First a note, only a Page Admin can perform this function, so if you have a social media manager (or are using a social media agency to manage Facebook for you) — and you don’t want to go through these steps yourself — you will need to assign them an ‘Admin’ role. Just remember to switch them back to ‘Editor’ or another role after they have completed this task. If you don’t know how to change a page role, I’ve written a post on how to add your social media manager as an ‘Admin’ on your Facebook Business Page — and why it is important you switch them back to an ‘Editor’ role.
Now, here are the steps you will need to save your Facebook data:
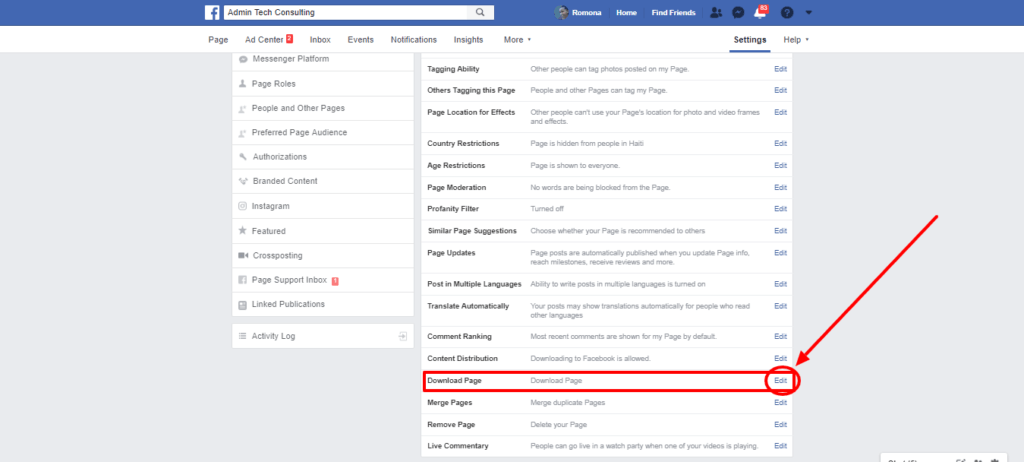
1. Go to your Facebook Business Page and click on ‘Settings’ in the upper right corner on the white navigation bar.

2. Scroll down on the ‘Settings’ page until you see “Download Page.’
3. Click on the ‘Edit’ link to the right of the ‘Download Page’ option.
4. Now click on the ‘Download Page’ blue link.

5. This will take you to the ‘Download Your Page Information’ page. On this page, you will see the following message:
You can download a copy of your Facebook Page information at any time. You can download all of it at once, or you can select only the types of information and date ranges you want …
6. You will also see a list of the types of data and information you can download from Facebook. The things you can download include:
-
Posts you’ve shared on your Facebook Page – posts that are hidden from your timeline, and polls you have created
-
Photos and Videos – that you’ve uploaded and shared on your Page
-
Events – A list of the events you’ve created for your Page
-
Page Profile Information – your Page’s name, website address, categories, contact info, location info and Page admins
-
Other Page Activity – activity associated with your Page
-
Page Settings – current settings for your Page

7. Check the box next to each of the data types you want to download.
8. Then, where you see ‘New File’ in the center block, select ‘All of my data’ or click on the drop-down arrow on the ‘All of my data’ button to select a date range.

9. Click on the blue ‘Create File’ button.
10. You will now see a message stating that your file is being created.
Your file is being created. We’ll let you know when it’s complete, so you can download it to your preferred device. You can cancel this process before the file is complete.

11. You will receive an email from Facebook thanking you for requesting a copy of your Facebook information and letting you know once they finish creating your file, you will receive another email letting you know it’s complete and ready to be downloaded.

12. Now, either click on the link inside of the email you receive from Facebook that states your files are now ready or follow step 13 below to continue the process on Facebook.

13. On your Facebook Business Page where you left off, click on ‘Available Files’ (it will have a number, which is the number of files ready to be downloaded), and click the ‘Download’ button (if the file is not ready, there will be a ‘Pending’ link instead.
When the file is ready, click on the gray ‘Download’ button and Save the file to your computer.

That’s it! You should now have all of your Facebook data and content saved in a .zip file on your computer.
If you need help with downloading your data and content from your Facebook Business Profile, be sure to schedule a free 15-minute consultation with me here.
Sources:
- How To Download Your Facebook Timeline Photos, Posts, And Other Activity You’ve Shared (Download Your Facebook Data)
- How To Add Your Social Media Manager As Admin On Your Facebook Business Page
- Facebook Down: Social network struggles to deal with epic outage
- Facebook and Instagram are officially back and blaming server configuration change for outage
Author: Romona Foster
Romona Foster is the Social Media Trainer and Consultant at Social Media How To’s with Romona. Romona teaches small businesses and nonprofits how to use Facebook, LinkedIn, Twitter, Instagram, Google My Business — and the best practices of Email Marketing, Online Marketing, Affiliate Marketing, and Personal Branding. She is a featured contributor with Business2Community and is a Constant Contact Community blogger.